Room Monitor User Guide
Room Monitor Help
Use your Mac and a connected camera to watch for changes in a scene and save images, video, or both when motion occurs.
Room Monitor analyzes camera images on your Mac, records events to a folder you choose, and can run manually or on a recurring schedule. This guide explains how to get started, what each setting does, and how to obtain useful recordings without excessive false alarms.
New to Room Monitor? Begin with Getting started. For unexpected recordings or missed motion, go directly to Practical configurations or Troubleshooting.
1. Getting started
- Review the legal documents. On the first launch, and again when an updated installation or legal document requires it, acknowledge the Privacy Policy and accept the License Agreement. Camera use is blocked until both steps are complete.
- Grant camera access. Allow access when macOS asks so Room Monitor can show a preview and detect motion.
- Select a camera. Use the Camera control in the main window. If a newly connected camera is absent, select the refresh button beside the camera list.
- Choose where recordings go. Open Settings… → Storage → Save events to → Choose… and select a parent folder. Room Monitor creates its own Room Monitor subfolder there.
- Choose your recording type. Under Settings… → Event Capture, select Still Images, Video Clip, or Stills + Video.
- Click Start Monitoring. Room Monitor first completes the configured Initial delay before monitoring, then begins accepting motion events. Move through the scene to test your setup.
- Review the result. After an event completes, choose Show Event or Show Events to open the recordings in Finder.
Preview versus monitoring: The live camera preview may be visible while monitoring is stopped. No motion-triggered events are captured until monitoring is started manually or by an active schedule.
Once this basic workflow succeeds, adjust motion sensitivity, image quality, capture timing, and scheduling to suit your location.
↑ Back to top2. The main window
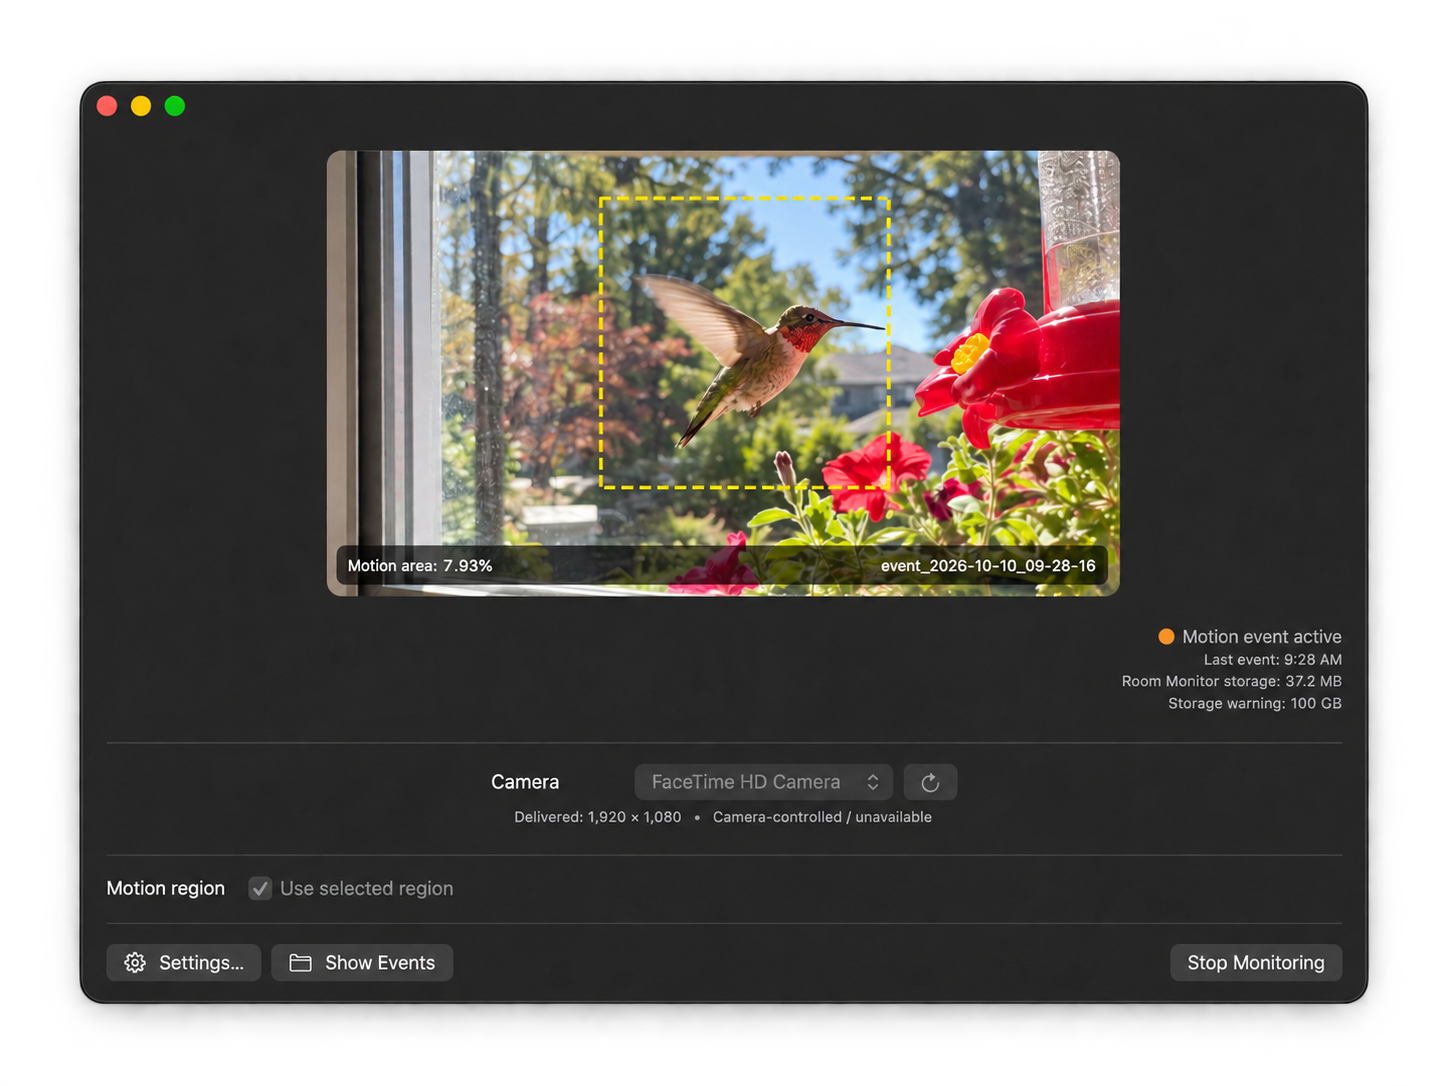
| Item | What it tells you or does |
|---|---|
| Live preview | Displays the selected camera image. While monitoring, the overlay reports Motion area—the proportion of sampled points that changed. |
| Recording indicator | A MONITORING badge appears in the preview while armed. A red RECORDING badge replaces it while a motion event is being captured. These visual indicators cannot be disabled and are not inserted into saved recordings. |
| Status indicator | Gray indicates not monitoring; green indicates active monitoring; orange indicates an active motion event or an event awaiting review. The accompanying text gives the current state. |
| Last event | Shows the most recent event time for the current session, when available. |
| Storage information | Shows the estimated Room Monitor destination usage and the configured storage-warning amount. Usage is highlighted when its threshold is exceeded. |
| Camera | Selects the camera; the refresh button updates the available-camera list. Delivered reports actual received frame dimensions; the focus label indicates camera autofocus support/status. |
| Use selected region | Enables detection within a rectangle drawn on the preview. When off, the entire image is checked for motion. |
| Settings… | Opens the five settings categories described in this guide. The usual macOS shortcut is Command-,. |
| Start / Stop Monitoring | Arms or stops motion detection and event capture. Stopping leaves the preview available. |
| Show Event(s) | Appears when there are unreviewed events. Opens the destination in Finder and clears the session's unreviewed count. |
During an event, the preview can display the event-folder name. During startup or between events, status text may say Arming or Event cooldown with a remaining time.
The red badge only appears once an event has successfully started (not merely when motion is detected). If staging cannot be created, the application reports an error instead of falsely announcing a recording.
↑ Back to top3. Camera setup and motion region
Choose a camera and resolution
Open Settings… → Camera to choose a camera and an available Resolution. Formats are listed with their dimensions and maximum supported frame rates. The Delivered frame value reports what the capture session actually supplies, which may differ from the requested format. The Focus field indicates whether continuous autofocus can be requested or is managed by the camera.
Camera and resolution changes are unavailable while monitoring. Stop monitoring before making those adjustments.
Monitor only part of the image
- Stop monitoring if it is running.
- Enable Use selected region in the main window.
- Drag across the preview to draw the rectangle you want monitored. A dashed yellow outline shows the selected region.
- Start monitoring again. Motion detection now examines only that area.
To redefine the region, stop monitoring and drag a new rectangle. To return to full-frame detection, turn off Use selected region. Your rectangle is remembered if you enable it again.
Important distinction: The selected region limits motion detection; it does not crop saved stills or video. The full camera frame is recorded when an event is triggered.
4. Understanding motion detection
Room Monitor compares the brightness of sampled positions in successive camera frames, within either the whole image or your selected motion region. Positions with a sufficiently large brightness difference are counted as changed. The percentage of changed positions is displayed as Motion area while monitoring.
An event begins only when the proportion of changed positions reaches the minimum area and this condition persists for the required number of consecutive frames. The app can then keep the event open briefly after motion stops.
| Motion Detection control | Effect of increasing the setting |
|---|---|
| Brightness change sensitivity | This is a Low / Medium / High selection, not a numeric slider. High notices smaller brightness differences and is more sensitive; Low requires larger differences and is less sensitive. |
| Minimum changed area | Requires a larger portion of the monitored region to change before an event qualifies. Helps ignore small moving details but can miss small subjects. |
| Frames to confirm motion | Requires motion in more consecutive camera frames. Reduces one-frame disturbances but can miss very brief movement. |
| Continue after motion | Keeps a recording active longer after the last confirmed motion, reducing fragmented events when activity is intermittent. |
A practical example
If Minimum changed area is set to 5%, at least about 5% of the sampled positions inside the active detection region must change enough between frames to qualify. This is a measure of image change, not the physical size of a person or object. Camera noise, lighting changes, shadows, and moving backgrounds also influence the result.
Start with Medium brightness change sensitivity. Adjust Minimum changed area and Frames to confirm motion before making dramatic sensitivity changes.
↑ Back to top5. Choosing what to capture
Use Settings… → Event Capture. The available options change with the selected Capture type.
| Capture type | Saved media |
|---|---|
| Still Images | JPEGs from before motion (if configured), one immediately at event start, and additional images at the chosen interval while the event remains active. |
| Video Clip | One H.264-encoded MP4 per event, including available pre-motion buffered video. |
| Stills + Video | Both JPEG images and an MP4 event clip. |
Timing settings
| Control | What it changes |
|---|---|
| Initial delay before monitoring | Time after monitoring starts before a motion event is allowed. Useful for leaving the scene and for camera exposure/focus to settle. The app can still build pre-motion history during this delay. |
| Delay between events | A true cooldown following an event: brief activity entirely within this interval does not start a new delayed event. |
| Capture before motion | How much recent footage or still-image history may be included from before motion is confirmed. History is buffered in memory; the available amount depends on camera activity and resource limits. |
| Still capture interval | Time between regular saved stills. It also governs sampling of pre-motion still history. One still is requested immediately when an event starts. |
Video and microphone
Video is saved as H.264 in an MP4 file. The Frame rate choices are 10, 15, and 30 fps; 15 fps is a sensible starting point for room monitoring. Higher frame rates provide more temporal detail but may increase resource use and file size.
Enable Use microphone to add AAC audio to event video from the current default macOS microphone. Room Monitor requests microphone permission only when that option is enabled. When possible, corresponding pre-motion audio is also included. There is no microphone audio recording in the still-images-only mode.
Microphone selection: Room Monitor uses the default input device set in macOS. To change microphones, select another input in System Settings → Sound → Input before recording.
Still-image quality and timestamps
Choose Image quality (Low, Medium, or High). Higher JPEG quality generally means larger files. Room Monitor attempts high-quality still capture through the camera when available and can fall back to saving frames from the video stream.
With Add timestamp to saved still images enabled, the saved JPEG has a visible date/time annotation. If you also enable Also save original still without timestamp, Room Monitor writes a second unannotated JPEG alongside each annotated still. These options do not add annotations to MP4 video.
↑ Back to top6. Scheduling, unattended use, and alerts
Multiple recurring schedules
In Settings… → General, enable Automatically monitor on a schedule. You can edit an existing schedule or choose Add Schedule to create additional rules. Each rule has an Enabled checkbox, weekday selection, an All day option, and (when All day is off) Start and End times.
Monitoring is requested when any enabled schedule is active. Overlapping schedules are combined; they do not continually stop and restart the camera. A schedule whose start and end times are the same is inactive—use All day for 24-hour coverage on selected days.
Overnight example: Select Monday with a 6:00 PM start and an 8:00 AM end. Monitoring continues into Tuesday morning until 8:00 AM because the overnight interval belongs to the Monday schedule.
Manual monitoring is not stopped just because a scheduled period ends. Conversely, monitoring started by a schedule normally ends when no schedule remains active. A schedule can begin only when Room Monitor is running, the Mac is awake, a camera and destination are available, and the legal review and Responsible Use acknowledgment are current. If a scheduled start cannot proceed because a destination has not been chosen, the app does not display a folder picker automatically.
General options
- Prevent idle sleep while monitoring: Asks macOS to keep the Mac awake while monitoring is active. It does not guarantee operation through manual sleep, shutdown, or closing a laptop lid.
- Launch Room Monitor at login: Registers the application as a Login Item, allowing a saved schedule to be evaluated after you log in.
- Notify when a motion event begins: Requests macOS notification permission and posts a local Notification Center alert when an event starts. These are not remote push, email, or SMS alerts.
Recording announcements
Under Settings… → Event Capture → Recording Indicators, you can enable or disable the recording-start chime, adjust its volume, and select Test Sound to hear it. The chime sounds once when an event begins and does not require notification permission. The preview shows MONITORING while armed and a conspicuous red RECORDING badge while capturing an event; the visual indicator is always enabled.
The audible announcement may not reach anyone in the room if the Mac is muted or routes sound to headphones. Moreover, any configured Capture before motion frames can predate the chime. If microphone capture is on, speakers playing the chime may also be audible in the saved video. Operators should arrange appropriate notice to people in the space independently of these software indicators.
Menu-bar and Dock indications
The Room Monitor menu-bar item displays status and provides Start Monitoring, Stop Monitoring, Open Room Monitor, and Quit. When an event is awaiting review, it can also show event details and a Show Events command. The Dock icon displays a numeric badge for unreviewed events in the current app session.
↑ Back to top7. Reviewing recorded events
Room Monitor stores one folder per completed motion event. The Show Event or Show Events button opens the dedicated destination directory in Finder. Selecting it also marks the current session's unreviewed events as reviewed, clearing the associated Dock badge.
The last-event and unreviewed-count indicators are session information rather than a permanent inventory of recordings. Restarting Room Monitor resets that session state; the recording files remain in their destination unless you or the retention policy remove them.
Folder and file layout
Folder you selected/
└── Room Monitor/
    ├── event_2026-10-10_14-30-05/
    │   ├── event.mp4                  (video modes)
    │   ├── pretrigger_..._0001.jpg   (when available)
    │   ├── motion_..._0001.jpg       (still modes)
    │   └── motion_..._0001_original.jpg (optional)
    └── event_2026-10-10_17-12-44/
        └── ...
The date and time identify the event folder. Still filenames include their capture time and sequence number. Exact contents depend on capture type, timing, camera support, and available pre-motion history; the example above combines options that may not all be enabled.
Why a newly recorded event might not appear immediately
Events are first written to a private staging area on the Mac. Once all recording and file-writing activity finishes, Room Monitor delivers the completed folder to your chosen destination. It temporarily uses a hidden name while copying so an incomplete folder is not presented as a finished event.
If the destination is a disconnected external drive, unavailable network folder, or temporarily inaccessible cloud-synchronized location, the completed event remains staged locally and delivery is retried. When the destination is restored, allow time for transfers to complete. The event indicator can reflect a completed event even before its delivery has finished.
↑ Back to top8. Storage, retention, and disk safeguards
Choosing a destination
Under Settings… → Storage, choose the parent folder using Save events to → Choose…. Room Monitor creates and uses a dedicated child folder named Room Monitor. The Last saved file field identifies a recently delivered recording when available.
Local disks, external drives, and supported network or synchronized folders can be used, subject to macOS permissions and their availability. If you select a folder managed by Dropbox, iCloud Drive, or another synchronization service, that service may subsequently sync recordings according to your own account settings; Room Monitor itself does not upload them to a developer-operated service.
Two different storage thresholds
| Setting | Behavior |
|---|---|
| Room Monitor storage | Informational estimate of the total logical file size under the dedicated Room Monitor destination folder; it is not necessarily the same as disk space allocated on local storage. |
| Storage warning | Highlights the displayed usage when it exceeds the configured limit. It does not delete recordings or shorten the retention period. |
| Minimum free disk space | Prevents new monitoring activity when insufficient space is detected for event recording; checks include local staging and, when available, the selected destination. Monitoring may stop if the threshold is crossed. Setting it to 0 disables this configurable free-space threshold. |
Automatic retention
Enable Delete old event folders automatically and set Keep events for to determine when Room Monitor may remove old recordings. The initial defaults in this build are enabled and 30 days.
Retention deletes files. Automatic cleanup only considers correctly named and marked Room Monitor event folders inside the app's own dedicated destination directory. It does not treat the selected parent folder as a general cleanup target. Nevertheless, if you want permanent copies, move or back up the events you wish to keep outside this managed folder.
Routine cleanup is automatic. Room Monitor pauses deletion and displays a persistent Review old events warning when it encounters eligible events on first inspection, after a long gap (normally more than seven days since the last successful check), when an existing destination is selected again, when the retention period is shortened, or when recordings are substantially overdue. Choose Review… to see how many event folders qualify, open them in Finder, postpone deletion, or approve deletion of the displayed set. If eligible folders change before approval, the app requires a new review. It does not display recurring modal dialogs while unattended.
Postponement can increase storage use. While deletion awaits approval, no other automatic retention sweep removes older events. Monitoring and event delivery continue when space permits, but low free space may eventually stop recording. The pending warning also appears in the menu-bar controls. Retention is not a guarantee that files disappear precisely when they pass the configured age.
The app verifies ownership markers before deleting eligible event folders and avoids following symbolic links. The storage warning does not override the retention age. Make sure your retention period and free-space setting suit the available storage and expected event volume.
↑ Back to top9. Settings reference
The following ranges and initial values were checked against this project version. If you have used Room Monitor previously, your saved settings may differ.
General
| Control | Choices / initial state |
|---|---|
| Prevent idle sleep while monitoring | On or off · initially on |
| Launch Room Monitor at login | On or off · initially off |
| Notify when a motion event begins | On or off · initially off |
| Automatically monitor on a schedule | On or off · initially off; supports multiple independent schedules |
Camera
| Control | Choices / behavior |
|---|---|
| Camera | Available video devices; refresh to rescan |
| Resolution | Supported camera formats, including maximum advertised frame rate |
| Delivered frame / Focus | Read-only status fields |
Motion Detection
| Control | Range / initial value |
|---|---|
| Brightness change sensitivity | Low, Medium, High · initially Medium |
| Minimum changed area | 0.1–20.0%, steps of 0.1% · initially 5.0% |
| Frames to confirm motion | 1–10 consecutive frames · initially 2 |
| Continue after motion | 0–15 seconds, steps of 0.5 · initially 2.0 seconds |
Event Capture
| Control | Range / initial value |
|---|---|
| Capture type | Still Images, Video Clip, Stills + Video · initially Still Images |
| Initial delay before monitoring | 0–15 seconds, steps of 0.5 · initially 5.0 seconds |
| Delay between events | 0–30 seconds, steps of 0.5 · initially 3.0 seconds |
| Capture before motion | 0–10 seconds, steps of 0.5 · initially 3.0 seconds |
| Still capture interval | 0.5–30 seconds, steps of 0.5 · initially 2.0 seconds; shown when stills are enabled |
| Frame rate | 10, 15, or 30 fps · initially 15 fps; shown for video modes |
| Use microphone | On or off · initially off; shown for video modes |
| Play a chime when recording begins | On or off · initially on; independent of macOS event notifications |
| Alert volume | 0–100%, steps of 5% · initially 40%; plays through the selected macOS audio output |
| Test Sound | Previews the chime at the selected volume without creating a recording |
| Image quality | Low, Medium, High · initially High; shown for still modes |
| Add timestamp to saved still images | On or off · initially on; shown for still modes |
| Also save original still without timestamp | On or off · initially off; shown when timestamps are on |
Storage
| Control | Range / initial value |
|---|---|
| Save events to | Choose a parent folder; Room Monitor creates a managed child folder |
| Last saved file / Room Monitor storage | Read-only location and usage information |
| Storage warning | 1–5000 GB, steps of 1 GB · initially 100 GB; advisory only |
| Delete old event folders automatically | On or off · initially on |
| Keep events for | 1–365 days · initially 30 days; shown when auto-deletion is on |
| Minimum free disk space | 0–100 GB, steps of 1 GB · initially 5 GB |
10. Practical configurations
These are starting strategies, not guaranteed settings. Begin with a short monitored test and adjust one control at a time. Lighting, camera noise, frame rate, subject distance, and field of view all affect results.
Quiet office or room
Use Medium sensitivity, start with the normal minimum changed area, and monitor the door or entrance region if movement outside that region is irrelevant. A modest Continue after motion duration helps group activity into one event.
Background movement
Exclude windows, fans, or moving plants with a selected region. If necessary, use Low sensitivity, increase Minimum changed area, or require more Frames to confirm motion.
Small or distant subjects
Try High sensitivity or a lower Minimum changed area. Use a selected region to reduce the total detection area, then test for false triggers caused by noise or lighting.
Longer activity and richer evidence
Choose Stills + Video, set a nonzero Capture before motion history, and increase Continue after motion slightly. Consider the additional disk and processing load.
If you get too many events
First exclude distracting areas. Then raise Minimum changed area or Frames to confirm motion, or reduce brightness change sensitivity. Increase Delay between events only if you deliberately want to suppress events immediately following another event.
If Room Monitor misses movement
Check the region, camera framing, and light level. Reduce Minimum changed area or the confirming-frame count; consider a higher brightness sensitivity. If activity occurs while the status reads Arming or Event cooldown, the timing settings may be intentionally suppressing it.
↑ Back to top11. Troubleshooting
No camera appears, or the preview stays blank.
Check the camera connection and make sure no other application is preventing its use. Click Refresh cameras next to the main-window camera picker. Check System Settings → Privacy & Security → Camera for Room Monitor permission. Stop monitoring before changing the camera or its resolution.
Room Monitor says camera or microphone access is not permitted.
Use System Settings → Privacy & Security → Camera or Microphone to review permissions. Microphone access is only needed for event video when Use microphone is enabled; you can disable that option to record without sound.
I see a preview, but no events are recorded.
Verify that the button says Stop Monitoring, confirming monitoring is active. Allow the initial delay to finish; check for an active event cooldown. Review the selected region, detection thresholds, camera movement, and destination. Short events may not reach the required consecutive-frame count.
There are many false motion events.
Check for exposure changes, sunlight, shadows, flickering lights, screens, ventilation, or moving background objects. Restrict the motion region and tune Minimum changed area, Frames to confirm motion, and sensitivity as described above.
Events are recorded, but I cannot find their files.
Use Show Event(s) or inspect Settings… → Storage → Save events to. Look in the automatically created Room Monitor subfolder, not just the parent folder you selected. When storage is disconnected or slow, completed events can remain in local staging until transfer succeeds.
Scheduled monitoring did not start.
Verify Automatically monitor on a schedule is enabled, and that at least one schedule is enabled with selected weekdays and valid hours. The Mac must be awake and the application running with a camera, destination, and accepted legal review and Responsible Use acknowledgment. Turn on Launch Room Monitor at login if appropriate, and consider Prevent idle sleep while monitoring.
Video has no audio.
Use a video capture type, enable Use microphone, and allow microphone access in macOS. Check the Mac's default Sound Input device. Still-image events do not record audio.
Recording stops because of low disk space.
Review Settings… → Storage → Minimum free disk space and the available space on both the Mac's local disk and the destination. Free space by archiving or deleting unneeded recordings. The Storage warning does not itself stop monitoring or delete files.
Automatic retention did not delete a folder.
Check that automatic retention is enabled and that the event is older than the specified age. If the main window shows Review old events, deletion is awaiting your approval. Otherwise, for safety, Room Monitor deletes only appropriately marked event directories inside its own designated folder; renamed, manually created, or unrecognized folders are not automatically adopted or removed.
I do not receive a notification on my phone or another Mac.
Room Monitor currently issues local macOS notifications only. It does not provide a remote notification, SMS, email, or cloud alerting service. Check Room Monitor's notification permission in macOS if local alerts are missing.
12. Privacy, legal documents, and support
Motion analysis and event creation happen on your Mac. Room Monitor does not require a Room Monitor account and does not transmit camera images, microphone recordings, or saved events to a developer-operated cloud service. The destination you select determines where recordings reside; any syncing performed by a separate storage provider follows that provider's rules and your settings.
The Privacy Policy, License Agreement, and Responsible Use statement are also accessible in the application's Room Monitor menu, Help menu, and About Room Monitor window. Reading them later does not change your recorded first-launch acknowledgment or acceptance. macOS camera and microphone permissions remain separate decisions.
For assistance, email [email protected]. Please include the Room Monitor version and build number (in About Room Monitor), macOS version, camera model, the feature involved, and a description of the behavior. Avoid emailing sensitive recordings unless you intentionally choose to share them.
Before your first monitoring session, acknowledge the Responsible Use statement. If a new app build or changed statement requires fresh acknowledgment, Room Monitor will request it again when monitoring is started. Monitoring cannot begin before this step; if you cancel, the app stays open. Provide appropriate notice to people who may be monitored; a visible sign is recommended and an optional physical indicator may help. Recording indicators in the app may not be noticed by everyone.
Online resources: Support · Privacy Policy · License Agreement · Responsible Use and printable monitoring sign.
↑ Back to top